Cameras Control
Every turret camera recognized by the system (see the system Launch Launch of STUDIO system), can be controlled via the Joystick shortcut via the button or any other Joystick assigned via the Controller configurations.
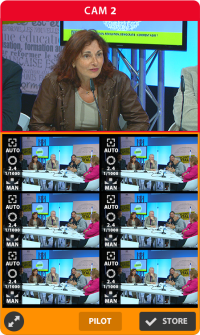
The controlled camera appears in orange frame.
If the camera is online, the frame of the preview will be red but the rest of the zone will be orange.
Control with a Joystick
The PTZ (Pan, Tilt, Zoom) movements assigned to the Joystick are generally:
- PAN: Moving the stick from left to right
- TILT: Moving the stick from high to low, similar to an aviation handle
- ZOOM: Rotation of the upper part of the stick
The more substantial the range of movement, the more substantial the speed of the camera movement.
To get softer and smother live shots, bring the Joystick back to the starting position.
Camera settings
The group of camera settings options is accessible at the bottom of the interface:

The possible different settings according to the manufacturer.
AUTO
In automatic mode, cameras offer 4 settings:
- FULL AUTO: The balance will be made automatically by the camera
- INT: A color temperature value will be chosen with regards to filming inside (artificial light)
- EXT: A value corresponding to the color temperature of the sun
- ONE PUSH: This is a process consisting of aiming at a white object (ideally to the position of a lit up face) filling the entire image, then by clicking on

MAN
The white balance in manual mode is carried out by playing with the amount of gain in Red and the gain in Blue.
No matter what the model of the camera is, the clarification is carried out in the following way:
- AUTO: The clarification is carried out via the camera’s electronic circuits, geared to the framed area
- MANUEL: A bar allows you to specify the distance of clarification between the foreground and the background.
- ONE PUSH: The automatic value is fixed after clicking on
AUTO
In automatic mode, the SONY and LUMENS offers to activate a BLC option allowing you to compensate for the back light.
SONY offers a BRIGHT setting allowing you to easily adjust the exposure with just one bar instead of two in manual mode (Iris+Shutter).
MAN
In manual mode, you can adjust the iris and the shutter according to your filming conditions (poor lighting, rapid movements, ...). Here is an outline to better understand the results of these adjustments:
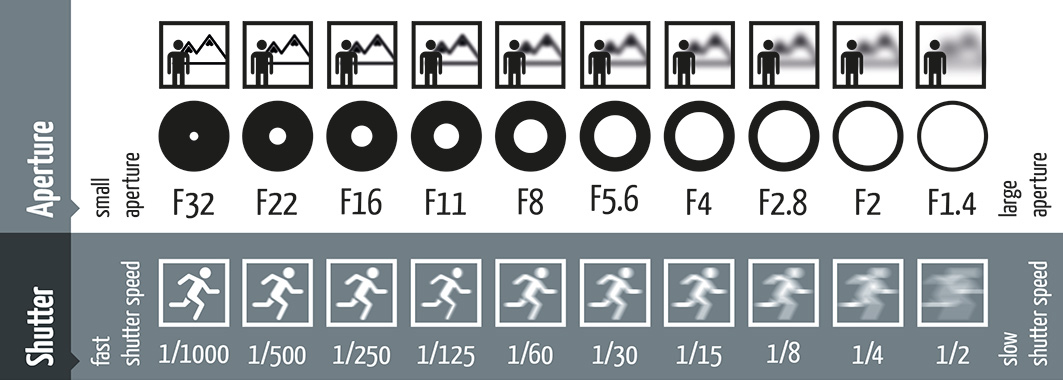
- IRIS: It’s the opening, that informs the camera of the quantity of light passing through the optic. It is marked according to the characteristics of the camera.
- SHUTTER: This is the pulse frequency. The quicker it is, the less light is picked up but the moving object will be more precise (high tempo shooting). Below a certain value, blurred images can appear.
- GAIN: This is a numeric value to raise or ease the light.
Properly measure the effects of your adjustments on the image. A shutter below 1/25 will result in a more significant motion blur. A gain higher than 6dB produces a noisy image.
To judge the quality of your adjustments, use the button  to preview your sources or video output on full screen. A second click anywhere deactivates the full screen mode.
The additional controls are accessible via the button situated in the upper right-hand corner of the camera settings: Cameras Control (advance)
Presets
You have 6 presets per controllable camera. They are stored information on the position of the camera (Pan, Tilt, Zoom) and its settings (W/B, Focus, Exposure).
Save a preset
Click on  to save a preset.
Then click on one of the 6 available locations. A label is then automatically created to represent the saved shot.
Recall a preset
Click on the label representing the shot you wish to recall.
An option is activated to stop the recall of presets of an on line camera.
Please consult the controller configuration Controller configurations for more info.